hexo ——setting
插入图片
开始的时候 md文件可以显示 但是在网页上无法显示图片 后经过设置才可显示上图的样子
遂mark解决方式
原因:据说是编解码的问题
解决方案:
使用
hexo官方的解决方案,使用模版变量,{% asset_img slug [title] %}该方法可行性不好 因为这样在typaro和vscode中无法显示 那么写内容时和不合
步骤
- 配置
hexo的_config.yml文件, 将post_asset_folder设置为true, 这样每次new 生成一个文章时都会同步生成一个同名的文件夹,然后设置相对或绝对路径 - 在博客根目录中下使用npm安装插件:
npm install https://github.com/CodeFalling/hexo-asset-image --save
- 配置

后续需要将图片放入到对应的文件夹下,但是对于很多截图很不方便 因此对于typora 通过设置(对偏好设置下的图片设置)可使得自动的将图片存入对应文件夹下:
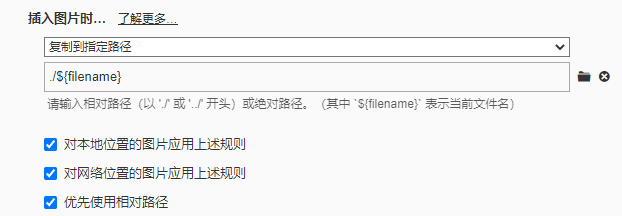
以后直接粘贴图片就可以自动保存到 hexo 配置的 post_asset_folder 文件夹里,自动渲染了
注意这时的插入的格式为
参考文章链接:解决Hexo博客不显示图片的一种方法 - 简书 (jianshu.com)
插入公式(解决起来比较困难)
Hexo渲染LaTeX公式关键(开始使用的时yaili 的主题出现了一些问题 在本地可以实现公式的显示 在网页上没有,现在补充最终版)
Hexo渲染主题的两个重要因素:mathjax和kramed,前者是数学公式渲染引擎,后者是Hexo的markdown渲染引擎,hexo默认渲染引擎是marked,但是它不支持mathjax,因此需要替换引擎
1.Hexo添加mathjax
1.如果hexo安装有hexo-math,需要先卸载它。卸载命令:
npm uninstall hexo-math --save
2.安装mathjax,安装命令:
npm install hexo-renderer-mathjax --save
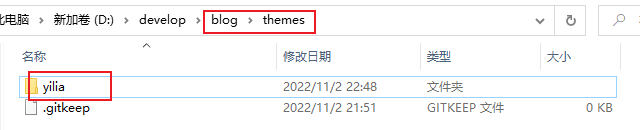
3.hexo主题开启mathjax:这里和参考的文章不同 我才用的主题时github上下载的yilia主题
配置yilia中的_config.yml文件(将mathjax:false 改为 true)
2.hexo切换kramed引擎
1.卸载marked引擎
npm uninstall hexo-renderer-marked --save
2.安装kramed引擎
npm install hexo-renderer-kramed --save
3.修改引擎bug:
修改文件/node_modules\kramed\lib\rules\inline.js中escape和em两行,具体修改如下:
1 | // escape: /^\\([\\`*{}\[\]()#$+\-.!_>])/, |
1 | // em: /^\b_((?:__|[\s\S])+?)_\b|^\*((?:\*\*|[\s\S])+?)\*(?!\*)/, |
4.重新启动hexo:
1 | hexo clean && hexo g -d |
可显示公式:
参考文章:Hexo渲染LaTeX公式 - 简书 (jianshu.com)
公式显示最终版
采用的是pandoc的插件
1.首先需要安装 pandoc:
Pandoc - 下载地址 安装后需要记住安装路径后续用
2.来到博客目录
1 | npm uninstall hexo-renderer-marked --save |
3 安装hexo-math 插件
1 | npm install hexo-math --save |
4.在hexo 博客中的 _config.yml 中添加 hexo-math 插件
1 | markdown: |
5.以目前最流行的 NeXT 为例, 打开 theme/next/_config.yml 文件,找到mathjax 位置, 设置为以下
1 | # MathJax Support |
5.在每一个博客中都打开 mathjax 开关
1 | title: 通过设置使得hexo正常显示图片和公式 |
6.重新编译以下
1 | hexo clean |
注意如果hexo g 时v互相如下报错
[hexo-renderer-pandoc] pandoc exited with code null.
那么需要在博客页面的 _config.yml文件下添加
1 | pandoc: |
重新编译和部署即可
还有一点需要注意的是:插入的公式和$符号间不可以有空格 否则无法显示
在hexo 根目录下的设置
1 | # Site |
添加标签页和分类页
在next 主题的设置文件下_config.yml
1 | menu: ## 可以添加页面 |
效果如下

正确打开标签页和分类页
1 | hexo n page tags |
就会在source中创建tags文件夹,并在里面创建index.md文件,表示已经可以使用
然后打开index.md 进行修改
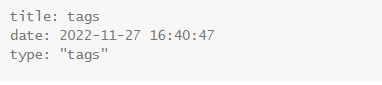
对于分类页同理,hexo n page categories 然后修改的时候type: "categories"
主题样式的更改
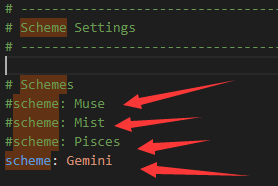
在next的主题配置文件里面 找到Schemes ,发现有四种主题:
要用哪个就把哪个前面的#去掉,其它的三个加上# (#代表注释);
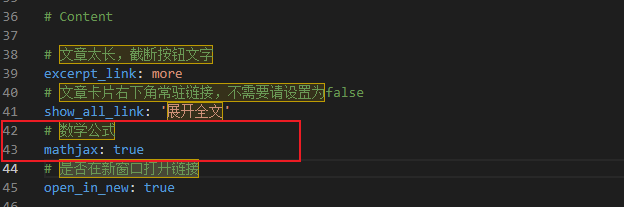
首页文章设置阅读全文
next的配置文件下,找到这里

把这两个都设置为true,默认应该是true;
然后有两种方法
在博客的头部 添加description,然后在后面输入你的描述,那么在你的博客中,这篇文章就只会显示你写的描述,剩下的由阅读全文这个按钮代替;

第二种办法:
在文章中输入这一行代码,那么默认这行代码之前的部分为描述,之后的部分在阅读全文中显示
1 | <!-- more --> |
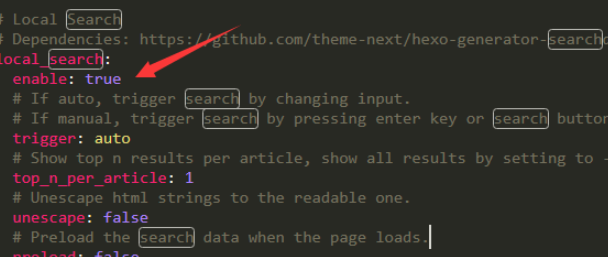
增加搜索功能
下载依赖
1 | npm install hexo-generator-seachdb -save |
next的配置文件中,置local_search为true